Monday 28 December 2015

Napoleonic British Grenadier Guards


Here are the figures that I promised to show you guys a while ago. I've had them finished for about 2 weeks now but I forgot to put them up. These are the first Foundry figures that I have painted and I have to say that I quite like them, A few annoying mold lines on the faces was the worst of it but apart from that they really just had standard flash. 

I'm painting up a unit of 24 Grenadier Guards and these are the first 9 out of the blocks. I decided to have a crack at painting all the same figures in one go and whilst its effective in getting them done a little faster it is a bit tedious. Nappys just take so damn long.

I've started on the next 9 (all kneeling figures and identical again...) and the command group will come after that. I still have a 16 man unit of Coldstream Guards to do but they're pretty well identical in paint job anyway. 


It's the first time I haven't painted figures already attached to bases and it threw me for a while as  kept getting my fingers in the way. In the end the old paddlepop stick and PVA glue trick seems to have done the job. 


I have now realised that the flank company's tuft colours need to be changed! I got on a bit of a roll painting the red and white so I'll have to go back and change it up.


The colours for the main uniform parts were all Vallejo.
Jacket: VJ Red base coat, Flat Red over that and highlights in Scarlet
Pants: Dark Grey base, London Grey over the top then Light Sea Grey and Light grey highlights
Shako/Grey areas: Dark Grey, black wash and Dark Grey again
Facings: Dark Prussian blue base (a few coats were needed) and then Tamiya Flat Blue

Questions, comments, tips and critiques all welcome!

Friday 11 December 2015

Holiday Blitz

It's been a little while since my last post and I don't have any new pictures for you...
Not because I've been lazy (well maybe just a little) but because I've been super busy.

I've been on holidays for about 3 weeks already but I really haven't had too much time for hobby related stuff as I've just come back from overseas. I'm about halfway through the first batch of Grenadier Guards and I hope to finish those off before I go back to work mid next week. I also had to strip a whole bunch of other figures that I'd undercoated in a White Knight grey spray primer. It ended up being really thick on the figures (even though I sprayed from a distance) and ruining the detail...needless to say I was pissed at having to strip them. Oh and I forgot I left a plastic horse in the Dettol for 2 weeks and it was just a blob when I took it out. Oops.

While I was away there were a few tasty sales for Black Friday and on ebay so I managed to snatch up a whole bunch of stuff and came home to about 4-5 packages. 6 Fallschirmjager sprues from Warlord for half price (and 6 Grenadier sprues in the mail) were too tempting to resist. I managed to pickup a sealed box of the metal Lord of the Rings Army of the Dead for a pretty reasonable deal and 11 Knights of Minas Tirith in varying states of repair. A bit of superglue, greenstuff and some inventive basing should see them come up nicely eventually. I hope.


Next post should have about ten of the Grenadier Guards up and running so until then happy modelling!

Monday 16 November 2015

Paras version 2.0

Just a quickie post of what I've been up to since my last post. The next ten paras are done, these are all warlord figures which I tend to like but I find they always have a lot of variation in the face casting. Some are awesome and others just look a tad strange. A lot of it you can paint out if you're careful but it's a bit of a pain.


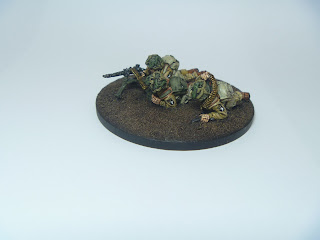
 I'll be covering the base of the .30 cal team with plenty of static grass/bushes when I do them all at the end so it'll look like they're hiding in the grass


60mm mortar team. These guys are great sculpts. Couldn't fault them


The next 4 are the Thompson gunners. Again in reality the uniforms are a little more sandy in colour and a tad less ochre. These guys have heaps more kit on them compared to the Artizan/Offensive figures that I did previously. I think I prefer it as it makes them look more like they're all geared up for action but it sure takes longer to get it all looking right.


It took me ages to figure out what the big yellow patch on the guy's shoulder was. Turns out it is a gas detection brassard that some of them wore. I was reading in the Ospreys that most of them ended up wearing it on their left shoulder in the end as it got in the way of aiming but Warlord seem to have left it on the right hand side


I'm going to take a break from these for the moment and paint up some British Coldstream Guards for something a little different. Plenty to do in the pipeline but I will get straight back into the other 17 airborne figures once I've gotten over my Para painting block!

Thanks for looking as always

Thursday 29 October 2015

First Ten US Paras

I finished these a few days ago but hadn't found the time to take photos of them. The photo's ended up being a quick and nasty job anyway to be honest. I still can't quite seem to get the lighting right to show them off and the photo's don't really do them justice. I think it might be the light cream colour on the highlights that gets washed out in the light


A couple of Artizan figs, I decided to do the pants on these ones a little different just to mix it up


A couple of carbine wielding fellas. They look a bit more yellow in the photos than in reality


Final group shot of the finished ones to date. The next ten are already on the desk


Questions, comments and suggestions are welcome!

Sunday 18 October 2015

US Paras test figure


I'v been working on a bunch of these as much as I can lately, I've got 37 to do and having never painted that many of one type of figure before it's a little daunting. I've decided to do them in batches of ten to try and get them done a little faster as I also have a whole bunch of Napoleonic British Guard infantry to do but given my snails pace painting style it might take longer than I think.


This is an Offensive Miniatures figure and I'm painting a whole mix of those and Artizan/Warlord Games paras. The Offensive ones are more anatomically correct with longer legs and the faces are nowhere near as caricatured as the others. Overall I think they're the best sculpts out of the lot for accuracy, just the guns tend to lack a little of the detail. I prefer the slightly chunkier ones of the Warlord/Artizan figures as they're easier to paint.


The decals are from the Warlord store and are about $4 AUD, well worth it to tie the figure together and I was never going to be bothered trying to hand paint the unit insignia.


I'm pretty happy with how this fellah has turned out, I haven't quite got the hang of the photography yet and it looks a bit more mustard coloured in reality. I'll post up the next 9 I'm working on over the next week or so 

Thanks for looking as always!

Tuesday 13 October 2015

Busy Boy

Sorry about the lack of recent posts, I haven't been idle I just haven't had anything ready painted up to show. Work and general life crap have kept me plenty busy for the last month or so.

I have managed however to get a bit of behind the scenes work done and I based and undercoated about 90 figures over the course of a few days. It always takes far longer than expected but the results are worth it in the end.

I've started work on a commission of around 40 US paras and I'm halfway through the first ten so I'm hoping to have some eye candy up by the end of the week so stay tuned!

Friday 11 September 2015

Empress Miniatures PLA

I've been off sick for a few days so I thought what better than to tackle digital camo....I've been living in fear of painting these figures
I expected it to be difficult but it still took a little longer to get the hang of before I committed to giving it a crack. I had a few old perry miniatures samurai figures that I use as test figures so a few hours later I thought it was worth a shot.


I used an cheap, small (I think it'd be about a size 2) brush I got at the hardware and trimmed down to make the bristles short enough for stippling.

I started by basing the camo with Vallejo Medium Sea Grey and took a little bit of care to leave very small black lines between the detail (of which there is stacks). Try not to make the lines too big as it will contrast hugely with the grey. I then gave it a light wash of Army painter Strong/Dark tone in a 50/50 mix and went back over it in the standard highlight method with Vallejo Light Grey.


Camo was done by rubbing off most of the paint from the stippling brush and trying to do really small patches (a smaller brush would help it be more controlled here). The green is Vallejo Gunship Green. Next up was the same idea with German Camo Medium Brown.


I tried to do the black spots a little smaller than the rest to stop it being too overpowering so I just got my 0 brush and tried to do some very small irregular black spots but not using too much paint because it will come up a lot darker than the stippled colours.


Face and hands were done in a standard darker skin tone that I made up (Flat brown, Flat brown/Panzer aces Shadows Flesh 50:50, Brown wash, Panzer Aces Shadows flesh, and lastly Flat Flesh/Shadows Flesh in a 50:50 again)

Boots were done in a black base and then highlighted by adding a little Pink (yes pink) to the black. That's a little trick I picked up out of the Painting War Magazines to make it a softer leather colour.

The gun was done by adding a very small amount of gunmetal grey to the black.

Let me know what you think about it!

Wednesday 9 September 2015

The Finished Product

Here they are at last.
I painted these for a nice guy down in Sydney and I'm pretty happy with how they turned out.

I really enjoyed painting these guys up, not quite as fiddly as german camo uniforms but with more than enough colour in them to keep me happy.


I scratch built the sandbags using greenstuff and added the tubing from the water cooler to the bottom of the Vickers


A couple of riflemen


The two Bren Gunners

I forgot to photograph the finished shoulder patches in the last post but here is one to get an idea of what they look like. Fairly simple but it adds a nice overall touch I think.

The sniper and a mate


Flamethrower


All the figures in the group are Artizan apart from the one on the right which is a Warlord Paul Hicks scuplt. It was just as good to paint as the Artizan figures and I wouldn't hesitate getting more.


Final group shot. Let me know what you think, all comments are welcome